Context:
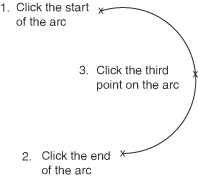
The following figure shows the resulting arc:

When you draw an arc using the Through Three Points method, you should
consider the same angle size and point selection prerequisites as described in
Sketching arcs using a center point and two endpoints.
-
From the arc tools in the Sketcher toolbox, select the Through Three
Points arc tool
 . For a diagram of the tools in the Sketcher toolbox, see
The Sketcher tools.
Abaqus/CAE displays prompts
in the prompt area to guide you through the procedure.
-
Click the two points that you want to use as the endpoints of the arc.
Abaqus/CAE
draws a sample arc with a predetermined radius as you select the second
endpoint of the arc. You change this sample radius when you select the third
point.
-
Move the cursor to the third point on the arc, and click mouse button
1.
Abaqus/CAE
draws an arc joining the endpoints and passing through the selected point.
-
To create more arcs, repeat the above steps beginning with Step 2.
-
When you have finished creating arcs, do one of the following:
-
Click mouse button 2 anywhere in the
Abaqus/CAE
window.
-
Select any other tool in the
Sketcher
toolbox.
-
Click the cancel button
 in the prompt area.

 . For a diagram of the tools in the Sketcher toolbox, see
 to reverse the selection of either endpoint. Clicking one
enables you to reverse the selection of the second endpoint; clicking twice
reverses the selection of the first endpoint as well.
 in the prompt area.