-
From the Dymola Component Editor, click the Execute
tab.
-
In the Command Line area, specify the location
of the Dymola executable file (
dymosim.exe) command
line options when launching the Dymola executable file:
-
Click Find dymosim.exe, and navigate to the Dymola
executable file in your directory structure.
-
Click Open.
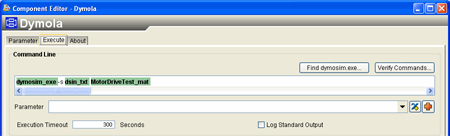
The file name for the Dymola executable appears in the Command
Line text box. By default, the name is followed by -s
<input file name> <output
file name> as shown in the example below.
-
Type the remainder of the command line following the program name.
For more information on additional Dymola arguments, see the Dymola
documentation. For more information on standard Isight arguments, see
About the Command Line Syntax.
-
Click Verify Commands to check the syntax of
the command line.
If there is a syntax error, the Dymola Component Editor
displays an error message describing the problem.
If the command is valid, a Command Line dialog
box appears showing how Isight
will interpret the command line—the command name, where arguments are
split, and any I/O redirection. The values of the substituted parameters
appear, instead of their name.
-
In the Parameter list, select a parameter to
use as an argument.
-
To add an existing parameter, select it from the parameter list and
click the  button. button.
Isight
adds the parameter name to the Command Line text
box at the current cursor position and highlights it in green, indicating
that the value will be substituted at run time.
-
To add a new parameter, click the  button and configure the name and other details in the
Add Parameter dialog box, and click the button. The new parameter will have data type Real,
but you can change the type on the Design Gateway
Parameters tab. button and configure the name and other details in the
Add Parameter dialog box, and click the button. The new parameter will have data type Real,
but you can change the type on the Design Gateway
Parameters tab.
To delete a parameter from the arguments list, click the parameter and
press the Backspace key.
For more information about working with parameters, see About Entering Parameters.
-
Set the Execution Timeout in the corresponding
text box. This setting represents (in wallclock seconds) how long the
component is allowed to execute. After this time the component will be
interrupted and then either retried or the simulation process flow will
fail.
-
Click Log Standard Output to send any messages
that Dymola writes to standard output to the Logs
tab on the Runtime Gateway.
-
Specify the following options in the Advanced Options
area, as necessary:
| Option | Description |
|---|
| StartTime | Set the
time (in wallclock seconds) for integration to start. The default value
is 0. |
|---|
| EndTime | Set the time
(in wallclock seconds) for integration to end. The default value is 30. |
|---|
| Increment | Set the
communication step size. This option is disabled if the value in the
Increment text box is 0. The default value is
0. |
|---|
| Interval | Set the number
of communication intervals. The default value is 500. |
|---|
|